|
By Erin Boehme The earliest May Day celebrations commemorated Flora, the Roman goddess of flowers and spring. May 1st, is the halfway point between Spring Equinox and Summer Solstice and is the celebration of the Earth, the Sun and fertility. Traditionally, this was the day people would gather to make flower crowns, dance around the May Pole, and jump over fires as a symbol of purification. Since ancient times, horseshoe or circular shape crowns has been a symbol of purity, eternity and glory. These rituals are rooted in gratitude and blessing the fertility of the land, while inspiring our own awakening and growth. In the spirit of Spring, create a crown of foliage and flowers to fashionably wear while dancing the May pole or lounging around the yard or house. Children love to wear flower crowns and play dress up. Suggested Materials: Wire Ribbon Long vines(Ivy, Honeysuckle, Trumpet vine, Periwinkle) Long strong grasses Long bendable green tree whips(Willow, Fruit wood, etc..) Flowers with long stems found around your home Create: Steps 1-4 might require an adult or older sibling to coordinate Steps 5-7 can be done mostly by children 1. Start by using the longest and most bendable material to create the crown form. (Wire or Plant material) 2. Measure the crown shape to the head for sizing. 3. Attach the material so that it makes a circle that stays together. Wire, vines, grasses and whips can be wrapped around themselves and woven together. 4. Add many layers of plant material until you have a sturdy base for your crown like a wreath. 5. Then take your long stem flowers and weave the stem through the openings in your wreath. Weave flower stems into the crown and continue going all the way around the circumference of the circle. 6. Try on the crown as you create to make sure it still fits. 7. Tie colorful ribbons to the back of the crown to create a rainbow of streamers. *If you only have greenery, it also makes a beautiful crown and the ribbon will bring the color! 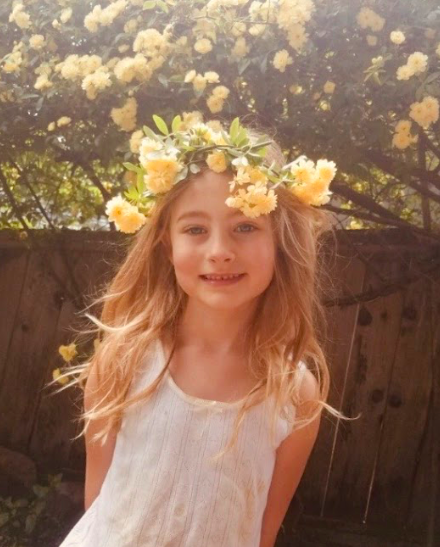
2 Comments
By Heather Young, Waterstriders teacher
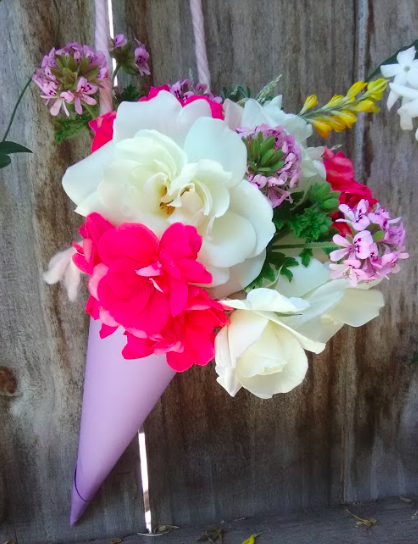
May Day baskets are small baskets that have traditionally been left on doorsteps or hung on doorknobs on the first day of May. They are filled with flowers, and sometimes other small treats or gifts. You can make your own beautiful May Day basket to give to friends, family, and neighbors--or to bring some springtime beauty to your own home. Often, these are left as a surprise on the porches or doors of neighbors, early May Day morning. This is an opportunity to have fun being sneaky while doing good. Materials: paper Paint/crayons/pens/colored pencils tape scissors ribbon/yarn/twine
By Erin Boehme, Dandelion teacher
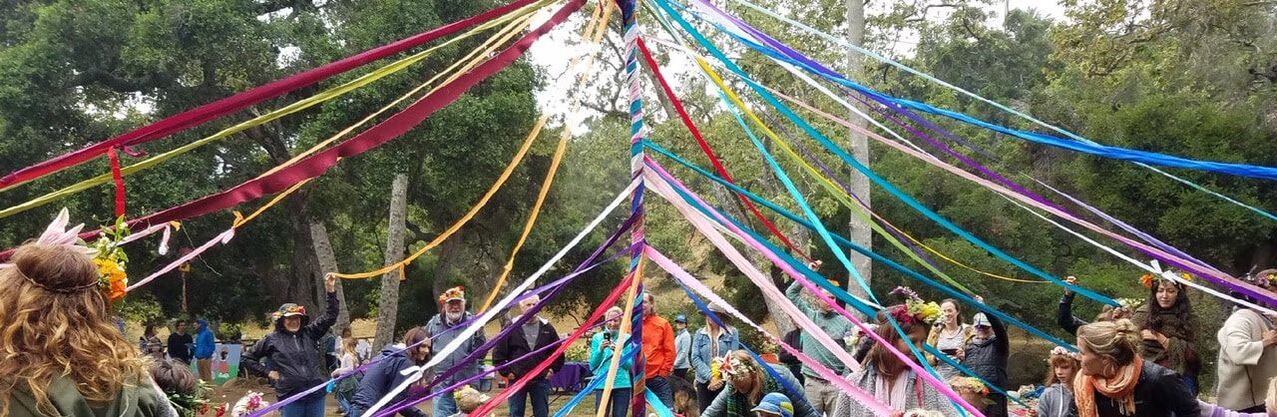
May Day is a joyous spring festival at Wild Roots Forest School. Children love to practice dancing around the maypole while holding onto the colorful ribbons and singing May Day songs. They will even enjoy this activity on their own, especially when accompanied by The Root Children Story, included below as an audio file. Here are the steps to crafting a Maypole at home. Materials: ~ A wooden pole (straight tree branch, broom stick, rake handle, porch post or a slim live tree) ~Horseshoe nails or heavy duty staples OR a drill to make holes through wooden pole ~Colorful ribbons, strings, strips of fabric(even fabric that is dyed or painted) ~ A hole in the ground or stable base or live tree Measure and prepare ribbons, string or fabric: Make sure the length go the ribbons reach from the top of the pole to the ground and that there's enough slack on the ribbon to hold onto when dancing. Secure the ribbons to the top of the wooden pole: Pound horseshoe nails or staples into the top of the pole, but make sure not to pound them in all the way. Put in one for each ribbon you will tie tot the pole. Tie a ribbon to each nail or staple around the circumference of pole. *If you are using a drill, make 2 holes in the wooden pole big enough to put 3 ribbons through each hole and secure with a knot on the other side. 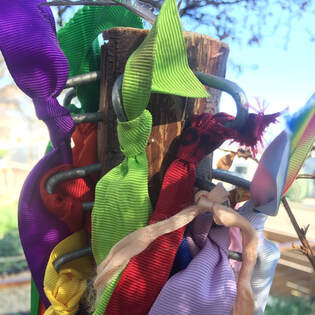
Live tree or porch post:
If using a skinny live tree or porch post, use a strong wire to tie ribbons on and around in a loop. Then take the wire and loop around tree or post at a good height securing tight enough to prevent slipping. Install wooden pole in a hole in the ground secure with large rocks at the base if needed. Decorate the top with flowers and greenery Flowers are always a special addition as a crown or in the hair for May Day play! 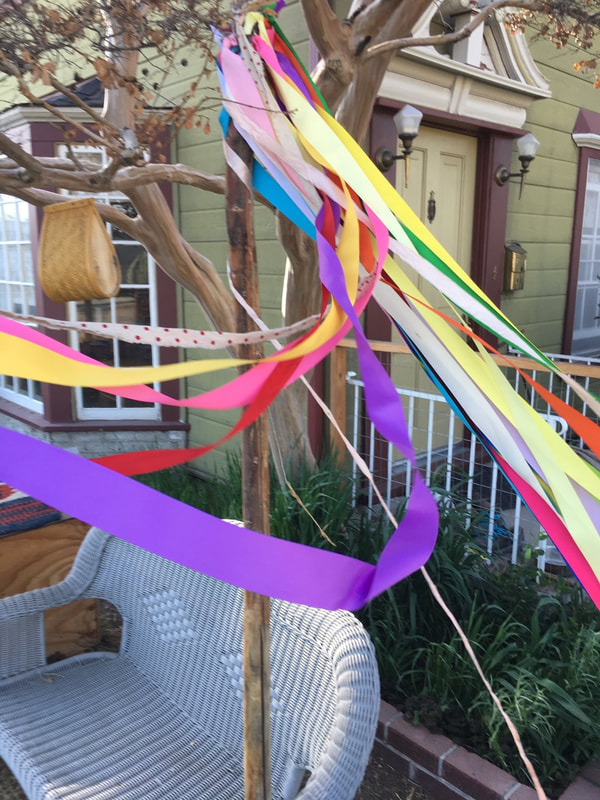
HAPPY MAY DAY!!  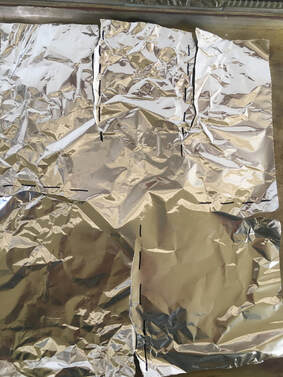 Tin Foil Sculptures By C.J. Cintas Gum was a specialty when I was growing up and whenever my sister and I would get a piece of gum, we would peel the tin foil from the wrapper and create people from it. Here’s how we’d do it: Gather sheet of tinfoil Doesn’t need to be anything special and can even be some that’s already been used as long as it’s not too dirty. Make 5 tears for the head, arms, and legs of your person: Holding the tin foil so it is taller than it is wide, split the top of the tin foil into three parts (a left arm, a head (middle) and a right arm), then make two tears at the waist and one tear at the bottom for either leg. Begin to twist or scrunch the individual sections: This is where you get to shape your person. Does it have a large head, small hands, toes? Form and shape: Have fun with your person. Take it outside, stand it up, dress it, make it a sword or a basket to carry! OR... just sculpt with tinfoil, a great recycled art material! 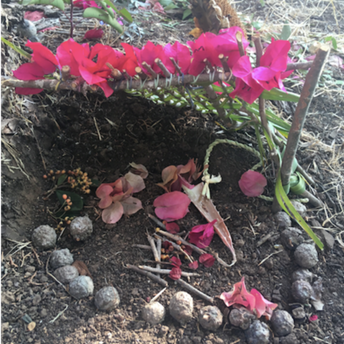 Posted by Anne McCarthy, Cattails teacher
Where would a fairy like to live? What does a gnome need to feel at home? Dedicating a spot in your yard (or in a natural area you visit frequently, if a yard is not available) as a place where your child can construct a fairy or gnome home, has many benefits:
There are no rules to building fairy houses, no right or wrong way. They’re all different, and interesting in their own way. Some might be tall, others underground… You might be surprised what your child will come up with. So get out there and start building (you might even want to make one yourself, who knows?)  Posted by Erin Boehme, Dandelion teacher
Take up a wind wand to frolick and dance, prance and play Fly it through wind gusts, through starshine and day Take up a wind wand Adventures await, stories will find you and take you away For this craft you need: ~A stick that is shorter than your child's arm(enjoy the measurement process. It will include figuring out how to break a stick) ~Colorful long ribbons or thin strips of light fabric (3-6 strands) ~Wire or twine (tape is optional) 1. Collect all the ribbon or fabric pieces together evenly on one end. 2. Tightly wrap the ends of the ribbon together with small gauge wire or twine and tie off so the bundle will not come undone. 3. Attached the end of the ribbon bundle to the end of the stick by wrapping wire or twine around bundle and stick many times until secure. 4. Twist or tie off wire or twine. (if you use wire, make sure any sharp ends are cut tightly and tucked under) 5. Use a strong tape to secure the bundle if needed. Once completed, use wind wand outdoors in any weather. Add live or recorded music, costumes and magic!! *Pro tip: When not in use, wind wands can be stuck in the ground or fastened to the porch railing for observation out the window. Wind wands need to be outside where they wait for old mother wind, brother wind and the merry little breezes to play with. |
AuthorWild Roots staff authors include Erin Boehme, Lia Grippo, CJ Cintas, Anne McCarthy, Tyler Starbard, Jenn Sepulveda, Heather Young, Amalia Smith Hale, Natalia Pareja... Archives
May 2020
Categories
All
|
 RSS Feed
